


Picture this. Communication lines are down, buildings are toppled over, roads are blocked, and crazed folks are looting supermarkets in your neighborhood.
At home, the power’s out, your stomach’s growling, and your thirst is gnawing at you like a pitbull on a chew toy.
Suppose you still have some food to ration over the next few days, but what about H2O? What happens after you down your last bottle of water?
In SHTF scenarios, finding safe water sources can mean life or death. You’ll need a sufficient water supply for your consumption, hygiene, cooking, and cleaning needs.
Seems a bit much?
Don’t fret! In this blog, we’ll give you the rundown on finding viable sources of water in your area, plus some bonus tips on purifying and storing water with ease. So buckle up, grab a drink (preferably not contaminated), and let’s dive right in.
Identifying Potential Sources of Water
First things first, you’ll have to learn how to identify the potential water sources in your area. Depending on where you live, most homes rely on either a public water supply or a private well for potable water.
If you rely on public water utilities, treated water is pumped through underground pipes to your house. Natural disasters like earthquakes and floods often contaminate or damage these underground pipes, affecting public water supply in SHTF scenarios.
When this happens, it’s time to look for alternative sources of water. Below, we’ve listed some viable options you can find indoors and outdoors.
Indoor Water Sources
If you’re resourceful enough, you can skip the chaos outside because you won’t have to look elsewhere. There’s water in the most unlikely places inside your home.
Bottled Water and Beverages
Let’s start with the obvious. For emergencies, gather any beverages you have in stock at home. The following drinks will provide the most hydration:
- Bottled Water – If you’ve been a diligent prepper, you should have a decent supply of bottled water tucked away in your food pantry. As long as you’ve kept it hidden from direct heat and sunlight, unopened bottled water can have a shelf life of up to 2 years.
- Sports Drinks – Plain drinking water is best for hydration, but sports drinks are another great option if your bottled water is in short supply. The electrolytes in sports drinks help replenish your body, especially if you’ve worked up a sweat fighting off a hoard of zombies.
- Milk – It may have skipped your mind, but milk can also keep dehydration at bay. The calcium, vitamin D, and proteins in milk can supply your body with nutrients it’s missing from being in survival mode. Just be wary of drinking spoiled milk since a bad stomach will dehydrate you further.
To stay hydrated and healthy, skip carbonated, alcoholic, sugary, and caffeinated drinks altogether. These beverages might satiate your cravings but won’t quench your thirst! Instead, try light exercises in the morning if you need a pick-me-up in the absence of your usual cup of coffee.
And beware, the higher the alcohol content in drinks, the more dehydrating it is. For this reason, steer clear of all types of liquor. While we imagine the taste of an ice-cold beer would be heavenly in an apocalyptic wasteland, we suggest taking our advice if you don’t wanna end up like a shriveled-up raisin.
Swimming Pool
Obviously, not everyone has a swimming pool, but if your home has one, Lady Luck must be on your side. This body of water might not be what you had in mind, but it’s still a viable option — granted you’ve kept up with its maintenance.
Even a small swimming pool can hold 15,000 gallons of water. In times of scarcity, this could be your golden ticket to survival.
Now, we’re not asking you to drink pool water. However, it can be a valuable resource for washing the dishes, showering, and even doing laundry.
Most times, chores become an afterthought in tough situations, but you’ll have to do them at one point or another to maintain some sense of normalcy. We suggest keeping a separate water supply for these less exciting tasks.
Melted Ice
When your power goes out, we recommend putting ice cubes inside your fridge in a clean container to melt. If you have enough of it, it might also help to scrape off some of the frost that’s collected in your freezer to melt in a separate container. It won’t be much, but anything counts when S hits the fan.
As long as it isn’t contaminated, water from the ice cubes should be safe for drinking. Meanwhile, you can boil the melted ice scrapings over a fire and use the water for cooking.
Water Heater Tank
A standard home water heater tank can easily hold 40-60 gallons. Since it already provides water for your tap and hot showers, draining your tank should provide a relatively clean water source for emergencies, regardless of whether your heater runs on gas or electricity.

Just don’t be surprised if you get funky, discolored water if you haven’t flushed out your water heater tank in years. Sediment collects at the bottom of the tank over time, so you’re supposed to drain your heater on a regular basis to maintain water quality.
If you’ve kept up with this maintenance, the water should come out clear, perfect for hygiene and cleaning purposes. This begs the next question:
Is It Safe to Drink?
People often debate whether or not water from the water heater can pass as potable. The answer depends on where you live and what plumbing system you’ve got. Below we’ve listed some things to consider before you take a sip of that water:
- The water in your heater may be treated, but it can still carry some built-up mineral deposits that can be unsafe and unpleasant to drink since hot water corrodes the metals inside the tank over time.
- Some pipes in older homes are still lined with traces of lead that can adversely affect health, especially in infants and children.
- It’s rare, but warm water can host legionella if your water heater isn’t keeping your water hot enough. Legionella is a type of bacteria that thrives in warm water systems with temperatures ranging from 25°C to 45°C. Inhalation of water vapor in infected water systems can cause a serious lung infection.
- Your water heater tank may also be contaminated if you fail to isolate it from the central water supply moments after a natural disaster.
Unless you have a relatively new and well-maintained water heater tank, go the safe route and use this water for anything but consumption purposes.
Liquid from Canned Fruits and Vegetables
This may seem like a reach, but if you have enough canned products in your pantry, you could end up with a fair amount of cooking liquids.
Instead of flushing the juice from canned fruits and vegetables down the drain, store them in separate jars and use the syrups for cooking desserts or sweetening up batters. Liquid from canned vegetables can also be added to soups or used to cook pasta and noodles.
And the good news is these liquids last forever. Well, not quite. But since they’re meant to preserve canned food, they’ll last you a long time.
Toilet Tank
Didn’t think we’d get here, did you? Now we’re not suggesting you drink from the toilet bowl. We assume you’re not that desperate.
However, the water inside your toilet tank is typically clean. Water in the flush tank is frequently cycled out, meaning water doesn’t sit there for days at a time. For this reason, it’s safe to be purified for drinking, provided it’s not mixed with chemical cleaning agents.
If you’re grossed out by any water source in close proximity to your toilet, don’t sweat. Water from your toilet bowl doesn’t back up into your flush tank. Once you’ve successfully squashed this mental hurdle, you’ll be happy to learn you’ve got an extra 3-5 gallons of water to use.
Trust us, we’re not beaming at the idea either, but it’s something to consider if you’re at your wit’s end, wracking your brain for potential water sources.
Outdoor Water Sources
Once you’ve exhausted all your options at home, it’s time to look to the Great Outdoors for more sources of water. Lucky for us, Mother Nature always provides. You just have to know where to look.
Rainwater
Whether you’re living off-grid or in an urban area, rainwater provides a renewable water supply that’s free and readily available. Plus, rainwater collection is inexpensive, easy to maintain, and once you get the hang of it, it partly cuts down your water bills.
You can use rain barrels to capture rainwater that flows through the downspouts of your gutter system. Rain barrels for residential use typically hold 50-90 gallons of rainwater.
Invest in filters for your rain barrel and keep them covered when not in use to prevent mosquitoes from breeding. Rainwater is typically clean, but it can still carry some of the dirt and bird droppings on your roof and gutter system, so we don’t recommend it for drinking.
You can use it, however, to water your lawn, wash your car, or clean your driveway and sidewalks.
Rainwater collected from off-grid areas is typically cleaner, so you might get away with purifying it for drinking if you have a good filtration system in place. If you want to take your rainwater collection up a notch, consider investing in a wet or dry catchment system for your home.
Fresh Water Systems
When S hits the fan, you’ll have more luck finding emergency water sources in the wild or off the grid than in urban areas. If you already happen to live near natural fresh water systems, then you’ve struck gold.
Most of our drinking water comes from fresh water systems like rivers, streams, and lakes. Out in the elements, try listening for sounds of running water or following signs of life and vegetation. You’ll eventually come across a body of water.
If you’ve found a fresh water source, you may be able to purify it for drinking. However, steer clear of stagnant water, as it can be a breeding ground for parasites and bacteria.
Always inspect the water for signs of contamination, discoloration, or odor. You wouldn’t want to down wastewater coming from urban factories, so clear running water will be your best bet.
Plants
This might shock you, but plant leaves are also viable water sources. When plants absorb water from the soil, whatever they don’t use up is evaporated through the leaves. This process is called transpiration.

To collect this water, you only need a clear plastic bag, a string to tie it with, and preferably a plant with large, green leaves. Below is a step-by-step guide to help you quench your thirst with plant transpiration:
- Select a branch with plenty of leaves and give it a good shake to remove any bugs or insect droppings on the leaves.
- Place the plastic bag over the branch, ensuring enough room for the leaves to hang loosely inside the bag. Putting up multiple bags at a time is ideal since you won’t be getting much water from a single branch.
- Tie the plastic bag securely with a string so the water vapor can’t escape and the condensation gets trapped.
- Leave it in the sun for approximately 3-4 hours to allow enough droplets to collect in the corners of the bag.
- Once time has elapsed, you’ll be left with about ⅓ cup of water. Run this water through a clean shirt or fabric to filter out any impurities that may have collected on the leaves.
- Reattach the plastic bag to another plant and restart the process to collect more water.
And there you have it! The great thing about transpiration is that plants remove much of the impurities from the water, so you’re left with clean, drinkable H2O. Just be sure to find clean leaves and non-toxic plants.
Good contenders for collecting transpiration include berry bushes and water-loving trees like willow and cottonwood. Try this with plants in your garden, too! You can do this multiple times because the process doesn’t hurt the plant. You’re just harvesting water that would have otherwise been evaporated.
Melted Snow
What better resource than frozen water that falls from the sky, right?
Freshly melted snow is safe to drink after boiling, but we’d like to stress the emphasis on melted snow. Don’t be fooled by survival movie cliches of eating handfuls of powder snow to hydrate.
Consuming snow straight off the ground will only put you in more danger of dehydration and hypothermia. It will require your body to expend more energy to melt the snow and regulate your temperature. That’s not very smart considering your body’s already working at capacity trying to keep you warm in a cold environment.
Not to mention, fresh snow can also bring contaminants with it. For this reason, steer clear of yellowing and discolored snow even if you plan to boil it.
We assume you won’t have advanced filtration systems when S hits the fan, so to err on the side of caution, pick fresh, white snow and boil in high heat for 10 minutes before drinking.
Purifying the Water
Once you’ve identified suitable sources of water, it’s time to make the water safe for use and consumption. Below we’ve outlined the easiest water purification methods you can do at home.
Boiling
Bringing water to a boil is the simplest way to purify water. The CDC recommends bringing water to a roiling boil for a full minute to make it safe for drinking. Time it from when the water starts boiling, not from the moment it is placed over a fire.
The boiling point of water is lower at higher altitudes, meaning you must compensate by extending your cooking time. At altitudes above 6500 feet, boil water for at least 3 minutes or more as needed.
Filtration
Physical filters work by straining fine particles and debris from the water. The more levels a filtration system has, the better it can eliminate impurities in the water. However, you don’t always need an industrial-grade filtration system to purify water.
You can create your own DIY filter for emergencies using materials from your backyard, like sand, charcoal, and small pebbles, as seen in the video below.

The finer your sand and charcoal are, the better your filter will work. Layer accordingly with the pebbles on top, charcoal in between, and sand at the bottom.
As you run water through this filter, the layer of pebbles on top gets rid of larger sediments and debris, while the sand at the bottom filters out smaller impurities. The fine charcoal in between works by absorbing contaminants in the dirty water. If you’ve done this right, the water should come out clear on the other end.
For an additional cost, you can also invest in portable water filters, perfect for finding water sources when you’re out in the wild.
However, note that physical filters cannot remove microorganisms from dirty water. Hence, it’s still best to sterilize the water via boiling or chemical treatments after running it through a filtration system.
Chemical Treatment
Public water systems use chemical treatments to make the public water supply safe for human consumption. To replicate the science that goes on in water treatment plants, you can also purify water at home using store-bought chlorine tablets, iodine drops, and even household bleach.
- Chlorine Tablets – As little as 1mg of chlorine can purify 1 liter of water, but the dosage can vary depending on your brand of chlorine tablets. Tablets also come in different sizes, so we highly recommend following the instructions on the container to know the appropriate dosage. Let the tablet dissolve and wait 30 minutes as it works its magic. If you’re bothered by the aftertaste, let it sit uncovered for a few more minutes as the chlorine evaporates.
- Iodine Drops – Iodine drops work similarly to chlorine tablets. Add five drops to each liter of water or 20 drops per gallon. Stir or shake the water afterward and wait for 30 minutes before drinking. Iodine also comes in tablet form and can be purchased at your local pharmacy.
- Household Bleach – Chlorine is the main active ingredient in most household bleaches, so you can also use Clorox to purify water for drinking. Two drops of 6% bleach should suffice to purify 1 liter of water or eight drops for 1 gallon of water.
Make sure to use only unscented and unexpired bleach. Per usual, let it sit for 30 minutes as the chlorine purifies the water and evaporates.
Note that no water purification methods can treat chemically contaminated water. You’d have better chances with green pond water than fresh water systems contaminated by a chemical spill.
Invest in home water testing kits for an added layer of security and as a last resort, use your senses to tell you whether or not the water is safe for consumption.
Managing Your Water Supply
After purifying water and making it safe for consumption, next comes collection, sanitation, and storage, which are equally important for maintaining water quality.
Collection
When stocking up on purified water, aim to store at least 1 gallon per person per day, as FEMA recommends. For the best odds, store at least a week’s emergency water supply per person. This should include water for consumption, hygiene, cooking, and cleaning.
To choose an appropriate water storage container, tick off the boxes in the checklist below:
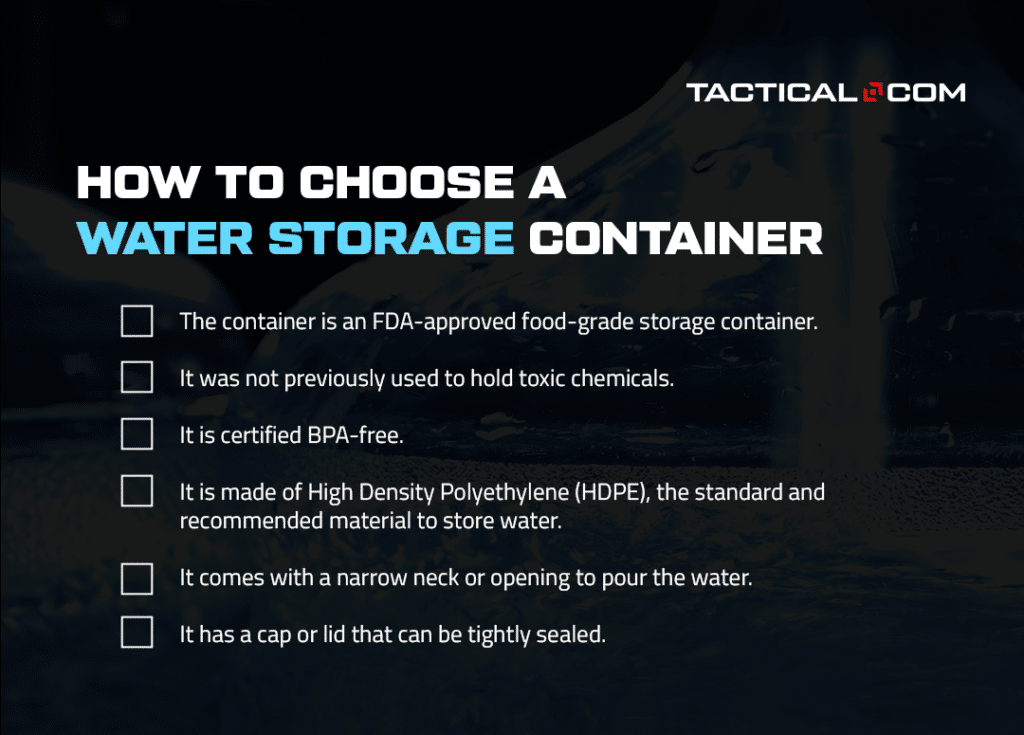
Don’t wait for a disaster to strike before purchasing water containers for storage. Food-grade containers are readily available at your local grocery stores for an affordable price.
Sanitation

To sanitize your container, you’ll need one teaspoon of unscented bleach diluted in one quart of water. Toss the mixture into the container, seal it, and swish it around so that the solution coats the entire surface of the container. Drain the solution once you’re done and allow the container to completely air dry before pouring purified water.
Storage
After collecting water and sanitizing your containers, remember these tips when storing them for emergencies:
- Store the containers in an area that doesn’t receive heat and sunlight. Basements and cellars are preferable.
- Ensure that no chemicals are stored alongside your water containers.
- Drain and sanitize your containers every six months to keep bacteria from growing.
- If you’re storing water in a cylindrical container with a wide opening, refrain from using the same tool each time you scoop water out of the container.
- Don’t touch the water inside the container with your bare hands to avoid contaminating the entire water supply.
- Label the containers according to their use (e.g., drinking water, sanitation, etc.) and storage date.
- Replace the water in the containers at least once every six months.
For a more comprehensive guide on managing your emergency water supply, check out our feature on how to store water safely.
Final Thoughts
Whether you’re a seasoned prepper or a novice, finding, purifying, and storing water are essential skills that could save your life in times of disaster.
By making an effort to learn the various water sources in your area, practicing the different water purification techniques, and reproducing the best practices for water storage, you can ensure that you and your loved ones stay hydrated in any emergency.
Multiple water sources are at your disposal both inside your home and out in nature. You just gotta channel your inner Les Stroud and make the most of what’s available to you!
Got any other emergency water sources we might have missed? Let us know in the comments!
