


Let’s go over your priorities when facing a survival situation:
Shelter and protection from exposure? Check.
Fire to keep hypothermia at bay? Done deal.
Water to prevent dehydration and stay alive? Covered.
Food? Not really an immediate priority, but you’ve got that down pat as well.
It seems like you’ve got the basics handled…except you haven’t. You’re still missing one more crucial part of your survival plan: signaling for help.
Why Signaling for Help Is Important to Know
Lots of preppers are guilty of overlooking the importance of signaling for help when, in fact, it should actually be on top of your list.
Remember, whether you’re lost in the woods, stranded on a desert island, or buried under debris after an earthquake, your first priority should be to get out of that situation. All the rest can come after.
Knowing different survival signals can mean the difference between life and death, so make sure to master this skill just like you would shelter-making or fire-building.
There are tons of ways to call for help and rescue. Some emergency signals are applicable only during certain circumstances, while others can virtually be used in any situation. If you think your signaling skills need some serious brushing up, read on:
3 Important Things to Remember When Signaling for Help and Rescue
Contrast Is Key
When creating visual emergency signals, having contrast is a must. You want your survival signal to stand out against the terrain’s backdrop and be easily recognizable, even if your signals are stationary or if your potential rescuers are a long way off.
For example, when you’re stuck on a snowy trail, you’d want to make a signal fire with dark smoke, so it stands out against the white landscape. Or, if you’re lost in the woods during the day, a bright orange flare would work best versus a white or red one.
Disturbances in the area’s natural appearance are also helpful stationary distress signals. Large SOS signs that can be seen from the air, cairns, and flags made from bright clothing or space blankets are effective ways to do this.
You want your distress signal to stand out against the terrain’s backdrop and be easily recognizable.
Three Times the Charm
This could be three consecutive shots from a firearm, three loud whistle blasts, three flashes of light from a flashlight or signal mirror—you get the idea. A triangle formed by three signal fires or three piles of rocks is also considered a distress signal.
When making visual or auditory signals this way, make sure they’re done in regular intervals so anyone in range can recognize it as a distress call and not just some random noise or flash. Take a whistle blast, for example. Each blow should last at least 3 seconds long and be done about a second apart. Wait for one minute before starting the pattern all again. We’ll talk more about that in detail as we go along.
Morse Code
The great thing about Morse is that you can send coded messages through sound, light, or even by blinking, just like the famous Vietnam War veteran Jeremiah Denton. Denton, who was a POW for 7 years at the “Hanoi Hilton,” alerted US Forces of the dire conditions of war prisoners by spelling the word “torture” through a series of blinks during a propaganda broadcast back in 1966. And yes, he lived to tell the tale.
The only downside to Morse code is that it can take a bit of time and practice to master, especially for individuals with no military or tactical background. If you don’t have time to learn the entire alphabet, at least learn how to send an SOS through Morse.
It’s pretty simple:

It’s three dots, then three dashes, followed by another three dots. Many think that SOS means “Save Our Ship” or “Save Our Souls,” but it actually doesn’t mean anything. It’s just that the letters “S” and “O” are the only ones made entirely of three consecutive dots and dashes in Morse, so they’re easily the most identifiable.
Rescue Signals and Methods
You’ve got the basics down. Now, let’s take a closer look at the methods you can use when signaling for help:
Use Your Phone

Pros:
- Lightweight
- Can directly call or send a message for help
- Able to make emergency calls
- Has other apps useful for survival
Cons:
- Battery-dependent
- Unreliable, especially in remote areas or the backcountry where cell service is patchy
- Can be damaged by an EMP attack
Scenarios:
- General emergencies
Cellphones are arguably the least reliable piece of gear you can use to call for help when you’re in trouble. Reception and cell service could be as lost as you are, especially in the wilderness. Without coverage and the internet, your smartphone is no more than a really expensive paperweight.
Still, having a phone in hand is better than having nothing at all.
If you can’t call, you can still try to send an SMS. Text messages don’t require a lot of connectivity or bandwidth, so it’s still possible to send a message or two to ask for help. You can also pack SIM cards from two or three different networks because you’ll never know…you might chance upon that errant bar of service somewhere along the way.
If things aren’t looking peachy, there are other ways to put that phone to good use: you can pick it apart and use its components to signal for help.
As seen in the video above, you can dismantle the phone and use its screen as a makeshift signal mirror. We’ll talk about signal mirrors at length further along this article.
Next, you can create an improvised compass using one of the small magnets found near the smartphone’s speaker component. This technically isn’t a way to send out a survival signal, but it will help you find your bearings and hopefully lead you to safety.
Here’s how you do it, according to avid bushcrafter and survivalist AlfieAesthetics:
- Take out a magnet and rub a small metallic object (like a pin or needle) against it for a couple of minutes until it’s magnetized.
- Once magnetized, put the pin on top of a leaf and carefully place it on a still pond or puddle.
- The pin will slowly turn as it aligns itself to the earth’s magnetic field and will point you north.
Get a Sat Phone

Pros:
- Doesn’t rely on traditional cell towers
- Uses satellite signals
- Can reach virtually anyone on earth
Cons:
- Expensive
- Will not work indoors or if anything is blocking the signal
- Battery-dependent
- Can be damaged by an EMP attack
Scenarios:
- Emergencies in remote outdoor areas
- Situations where traditional phone signals are down or overwhelmed (post-hurricane or earthquake, terrorist attacks)
Sat phones don’t come cheap—a unit can easily cost several hundred bucks a pop—but you might want to consider getting one if you frequently travel across the backcountry or similar terrain.
Unlike normal cellular phones, sat phones don’t rely on traditional phone towers for communication. Instead, they employ a fleet of orbiting satellites to send signals back and forth. As long as you’ve got an unobstructed satellite signal, you can get in touch with virtually anyone on earth and ask for help.
They also don’t need power lines, so they’re excellent for grid-down scenarios like hurricanes or earthquakes.
Most sat phones are lightweight and portable, with a relatively long battery life to boot. They can come in handy if you find yourself needing aid from a remote outdoor location, like how photographer Fredrik Granath did when he fell into a crevasse while on assignment in the Arctic.
The downside is that you need a clear shot of the satellite signal for your sat phone to work properly. They won’t work if you’re indoors (unless you’re near a window), trapped underground, or if there’s anything blocking the signal (like a mountain or tree).
Price is another pain point about sat phones—they’re crazy expensive. Prices usually start at around $700 for the most basic unit and can easily go up to around $1100. You also have to pay for service separately, which can cost you another $300 a year on average.
If you’re not keen on buying your own sat phone, you can always rent a unit right before your trip. The important thing is that you know how to operate the unit and the necessary area and dial codes to call for help when needed.
Check out the video above for the full low-down on how to operate sat phones from different providers.
Personal Locator Beams

Pros:
- Lightweight
- Uses satellite technology
- Cheaper than sat phones
- Doesn’t require a separate subscription fee
- Easy to use
- Batteries can last for at least 5 years
- Waterproof
Cons:
- High price point (starts at around $200+)
- Will not work properly when indoors or if there’s anything blocking the signal
- Battery-dependent
Scenarios:
- Emergencies in remote outdoor areas
- Situations where traditional phone signals are down or overwhelmed (post-hurricane or earthquake, terrorist attacks)
- Aircraft or marine vessel emergencies
Aircraft and marine vessels have been using various types of emergency locator beacons to send emergency signals over the years, but these devices didn’t come into civilian hands until recently.
A personal locator beacon (PLB) is a type of emergency locator beacon that allows you to send a distress signal to a wide network of satellites monitored by the National Oceanic and Atmospheric Administration (NOAA). These satellites then forward the signal to a search and rescue (SAR) team nearest your location so they can save your butt before the S truly hits the F.
Like sat phones, PLBs can work virtually anywhere in the world. They’re also lightweight and handy, with a battery that can last for at least 5 years. Unlike sat phones, however, PLBs can only exclusively send an SOS and are unable to make calls or send text messages. This feature makes them less versatile, but it also means you don’t have to spend extra on subscription fees.
Each PLB is unique—you have to register your unit in NOAA’s Search and Rescue Satellite Aided Tracking (SARSAT) database with your personal info like your name and emergency contacts. Most PLBs are also equipped with GPS and homing features that help SAR teams pinpoint your exact location.
As seen in the video above, you can activate your PLB with a push of a button. You can also whip out your PLB’s antenna so you get a better satellite signal.
Carry a Whistle

Pros:
- Cheap
- Lightweight
- High-frequency sound
- Does not need batteries
- Has little to no moving parts
Cons:
- Limited range
- May freeze or stop working in certain conditions
Scenarios:
- General emergencies
- When visibility is poor (i.e., trapped underground, floating at sea)
- When potential rescuers are nearby
- When you can’t call for help using your voice
Whistles are small, cheap, virtually weightless, and can produce high-frequency sounds that can be heard within a short range. You don’t need to spend a lot of energy shouting if you’ve got a whistle. Simply blow on it, and the sound can carry way farther than your voice would.
Its sharp, shrill sound can help rescuers pinpoint your location in case you get trapped under debris from earthquakes or landslides. They’re also especially useful if you get separated from, say, your hiking group or are injured and unable to move. You can also use it to alert passersby when you’re in danger in an urban setting.

Unlike mirrors, whistles don’t need any sunlight or other special conditions to send a distress signal. There are also special rescue whistles that have a higher decibel rating and can be used even when it’s freezing out.
To send a distress signal using a whistle, all you’ll need is a good pair of lungs. Produce three loud, consecutive blasts with your whistle, each one lasting approximately three seconds. Pause for a couple of seconds after each succession to allow the sound to carry before starting all over again. As mentioned earlier, this pattern is universally recognized as a distress signal, so anyone within range can come to your aid.
PRO TIP: Use a length of paracord to secure your whistle around your neck or as a fob. Unlike the usual lanyard, paracords are sturdier and can be used for various survival purposes like cordage, fire-making, fishing, and the like.
Signal Mirrors

Pros:
- Has long range and can be seen from great distances
- Can be used to send messages via Morse code
- Cheap
- Lightweight
- Does not require a power source
Cons:
- Can break
- Only works best with direct sunlight
- Depends on the sun’s angle/location in the sky
Scenarios:
- General emergencies, as long as there’s sunlight
People have been using mirrors to communicate for centuries, and for good reason: mirrors work.
A mirror’s surface can reflect light and project a beam that can be seen even from several miles away.
This allows you to ask help from passing cars, boats, or aircrafts, depending on the situation. Signal mirrors are also cheap, handy, and lightweight, making them ideal for anyone—from preppers to average everyday carry joes to seasoned outdoorsmen.

When push comes to shove, you can use practically any reflective surface (like a normal mirror, your phone, a shiny multitool, or a space blanket) to send emergency signals. They won’t be as accurate, but they’re certainly worth a shot.
Here’s how you can use these makeshift “mirrors” when signaling for help:
- Bring the reflective object to eye level.
- To help improve your aim, extend your free arm in front of you and make a sight by forming the letter V with your fingers.
- Make sure that the beam hits the spot between your fingers. You’re now ready to send an accurate distress signal to rescuers.
- If you can’t find a potential rescuer in sight, sweep your signal mirror along the horizon. It’s a long shot but still worth the try.
Flashlights

Pros:
- Has a long range and can be seen from great distances
- Can be used to send messages via Morse code
- Versatile
Cons:
- Battery-dependent
Scenarios:
- Emergencies occurring after dark
Tactical flashlights are arguably some of the most versatile pieces of gear that you can have. You’d be lucky to have one on your person should you find yourself in a precarious situation.
Tactical lights have a variety of uses: illuminating your path, defending yourself against perps, and—most importantly—signaling for help and finding your way to safety.
Modern tactical flashlights are relatively lightweight and compact, so they aren’t a burden to carry around. They’re also equipped with powerful, high-lumen beams that can reach at least a few hundred meters, allowing you to send emergency signals from afar, even in the dead of night.
Lastly, most modern tac lights have built-in SOS modes. If, for some reason, you forgot how to signal SOS (which you shouldn’t!), you can simply cycle through the modes and activate the SOS feature to send a survival signal.
The downside to signaling for help using tactical flashlights is that they depend on batteries. The higher the lumens used, the more power it will consume, so use your tac light wisely.
Flares and Flare Guns

Pros:
- Produces bright and intense light
- Has long range
- Easily recognizable
- Can be deployed quickly
Cons:
- Highly flammable
- Can cause wildfires
Scenarios:
- Emergencies while at sea
- Road accidents
- Emergencies occurring after dark
Signal flares are a pretty straightforward way to ask for help. They’re bright, precise, and very capable of attracting attention. They’re like huge, bright signboards saying: “Hey, I’m in trouble and need help ASAP.”
Flares come in three colors: white, orange, and red. White flares aren’t generally used as a distress signal; they’re more of a location indicator. They’re commonly used by ships to indicate their position and avoid possible collisions with other vessels. You can also use these if, for example, you’re lost but aren’t really in grave danger.
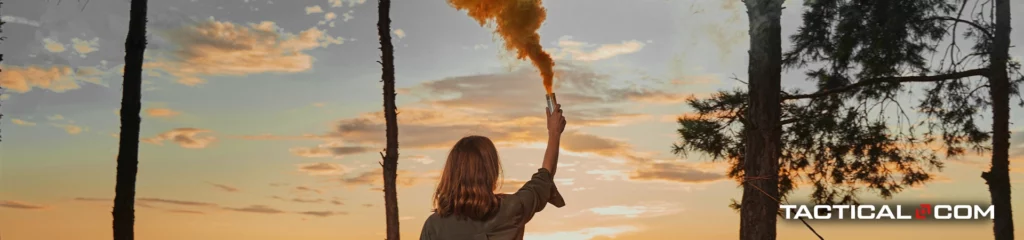
Orange and red are both considered distress flares and are used in signaling for help during an emergency. The only distinction between the two is that orange flares are more visible during the day and have more contrast against green backdrops (like a forest or jungle).
There are two general types of signal flares: aerial and handheld.
As the name suggests, aerial flares go high up in the air with the aid of a flare gun. Some types of aerial flares deploy tiny parachutes, so they stay in the air for longer, illuminating the area and allowing rescuers time to locate your exact position.
If you know how to use a firearm, you’d know how to use a flare gun or flare pistol, but in case you need a refresher, here’s how to do it:
- Gently pull the barrel open.
- Load the flare cartridge. Keep your hands away from the trigger until you’re ready to fire.
- Close the barrel and make sure it clicks back in place.
- Cock the flare gun.
- Point the flare gun straight up and pull the trigger to launch and ignite the flare.

Handheld flares are a much simpler affair. While they may not have the same range as aerial flares, these types of flares are great for pinpointing your exact location. They’re also pretty handy during road incidents—you can use handheld flares to ask for help or alert other motorists.
Lighting a handheld flare is pretty much like lighting a giant match.
Here’s how to do it:
- Determine the direction of the wind before lighting your flare. Make sure it’s blowing away from you so you don’t get burned.
- Hold the flare firmly with one hand. Take off its protective plastic cap to expose its flammable end or striker.
- The cap has another protective layer of plastic or pull-out tab, which covers the igniter. Take that one off, too.
- You’re now ready to light your flare. Hold it in the middle and strike its flammable end against the igniter in an outward motion.
- Hold it away from your body as you send the distress signal.
Another thing to remember is wind direction. Light your flare when the wind is blowing away from you. Always keep a handheld flare a good distance away from your body to prevent damaging your clothes and skin. If you can spare some eye protection, wear it.
Final Thoughts
Signaling for help is an underrated skill that a lot of preppers take for granted. Don’t make the same mistake! Remember, one of your top priorities during a survival situation is to get out of harm’s way as soon as possible, so make sure to practice these emergency signals just like how you would practice your other survival skills.
Have you ever experienced a situation where you tried signaling for help? Which distress signal did you use? Let us know in the comments below!
